|

Reference
Guide
|
|
Printing with Windows
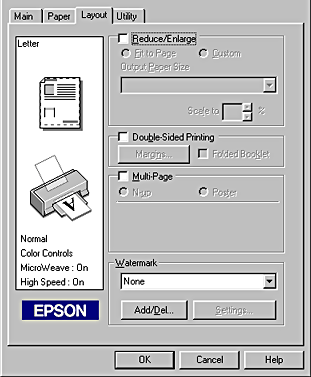
Making Settings on the Layout Menu
 Making the Reduce/Enlarge setting
Making the Double-Sided Printing setting
Making the Multi-Page setting
Making the Watermark setting
You can make Reduce/Enlarge, Double-Sided Printing, Multi-Page, and Watermark settings on the Layout menu. Refer to the appropriate section below.
Making the Reduce/Enlarge setting
Use the Reduce/Enlarge options on the Layout menu to fit your document to the paper size that you will print on.
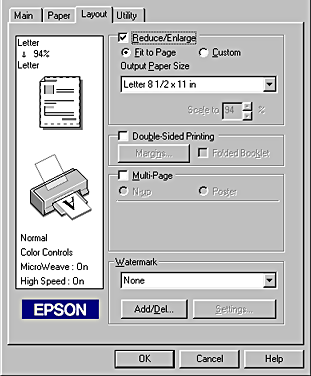
You can select from the following settings.
|
Normal
|
Prints your document at its normal size.
|
|
Fit to Page
|
Proportionally enlarges or reduces the size of your document to make it fit the paper size you select in the Paper Size list on the Paper menu.
|
|
Custom
|
Allows you to manually reduce or enlarge an image. Click the arrows next to the Scale to box to select a percentage between 10% and 400%.
|

[Top]
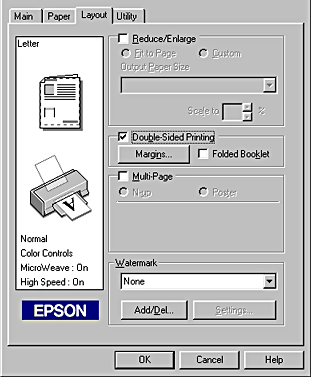
Making the Double-Sided Printing setting
There are two types of double-sided printing available. Standard double-sided printing allows you to print the odd-numbered pages first. Once these are printed, you can reload the printouts in the sheet feeder and print the even-numbered pages on the other side of the paper. Folded booklet double-sided printing allows you to make single-fold booklets. Refer to the appropriate section below.
 |
Note:
|
 | -
The double-sided printing feature is not available when the printer is accessed over a network or is used as a shared printer.
|
| -
You can load up to 30 sheets of paper at one time when double-sided printing; however, the loading capacity of the sheet feeder varies, depending on the media type.
|
| -
Only use media types which are suitable for double-sided printing. Otherwise, the printout quality may deteriorate.
|
| -
Depending on the type of paper and the amount of ink used to print text and images, ink may bleed through to the other side of the paper.
|
Standard double-sided printing
Follow the steps below to print first the odd-numbered pages and then the even-numbered pages after you have reloaded the printouts.
 |
Select the Double-Sided Printing check box on the Layout menu of your printer software. For information on accessing the Layout menu, see Accessing the printer software.
|
 |
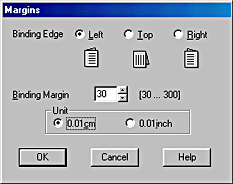
Click the Margins button. The following dialog box opens.
|
 |
Specify which edge of the paper the binding will be on. You can choose between Left, Top, and Right.
|
 |
Specify the width of the binding margin by entering a value in the Binding Margin text box. You can specify a value between 3 mm and 30 mm.
|
| |
Note:
|
| |
The actual binding margin may vary, depending on your application. Experiment by printing a few sheets using different binding margin values before printing the entire job; otherwise, the results may differ from what you expect.
|
 |
Click OK to return to the Layout menu, then click OK to save your settings.
|
 |
Load paper in the sheet feeder, then send the print job from your application. While the printer is printing the odd-numbered pages, instructions are displayed which explain how to reload the paper correctly.
|
 |
Follow the instructions to reload the paper, or reload the paper as shown in the illustration below.
|
| |
Note:
|
| | -
The paper may curl during printing, depending on the amount of ink used to print text and images. Flatten it or curl it slightly toward the opposite side before printing on the other side of the paper.
|
| | -
Tap the stack of paper on a flat surface to align the edges before reloading it.
|
| | -
Reload the printouts as instructed; otherwise, the paper may jam or the binding margin may differ from what you expect.
|

 |
Once the paper is reloaded, click Resume to print the even-numbered pages.
|
Folded booklet double-sided printing
You can also make single-fold booklets using the double-sided printing feature. When booklet printing, the printer first prints the pages which will be on the outside after you fold the paper and then prints the inside pages after you reload the paper, as shown in the illustration below.

In this example, the printer would print pages 1 and 4 of your document on the first sheet of paper, pages 5 and 8 on the second sheet of paper, and pages 9 and 12 on the third sheet of paper. After you reload the printouts in the sheet feeder, the printer would then print pages 2 and 3 on the back of the first sheet of paper, pages 6 and 7 on the back of the second sheet of paper, and 10 and 11 on the back of the third sheet of paper. After printing is complete, you can fold each sheet of paper and then bind the pages together.
Follow the steps below to print booklets.
|
|
Select the Double-Sided Printing check box on the Layout menu, then select the Folded Booklet check box.
|
|
|
Click the Margins button. The Margins dialog box opens.
|
|
|
Specify which edge of the paper the binding will be on. You can choose between Left, Top, and Right.
|
| |
Note:
|
| |
While Portrait is selected as the Orientation setting on the Main menu of your printer software, you can choose between Left and Right. While Landscape is selected, you can only select Top.
|
|
|
Specify the width of the binding margin by entering a value in the Binding Margin text box. You can specify a value between 3 mm and 30 mm. This margin width will be inserted on both sides of the fold. For example, if you specify a value of 10 mm, a 20-mm margin will be inserted, with 10 mm on each side of the fold.
|

|
|
Click OK to return to the Layout menu, then click OK to save your settings.
|
|
|
Load paper in the sheet feeder, then send the print job from your application.
|
|
|
While the printer is printing the outside pages, instructions are displayed which explain how to reload the paper correctly. Follow the on-screen instructions to reload the paper, or reload the paper as shown in the illustration in the previous section, Standard double-sided printing.
|
| |
Note:
|
| | -
The paper may curl during printing, depending on the amount of ink used to print text and images. Flatten it or curl it slightly toward the opposite side before printing on the other side of the paper.
|
| | -
Tap the stack of paper on a flat surface to align the edges before reloading it.
|
| | -
Reload the printouts as instructed; otherwise, the paper may jam or the binding margin may differ from what you expect.
|
|
|
Once the paper is reloaded, click Resume to print the inside pages.
|
 |
Once printing is complete, fold the printouts properly and bind them together using a stapler or other binding method.
|
[Top]
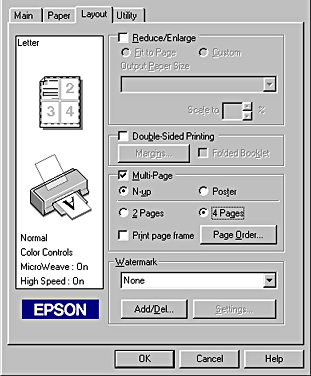
Making the Multi-Page setting
Selecting the Multi-Page check box allows you to choose between the N-up and Poster settings. Refer to the appropriate section below.
Making the N-up setting
Select N-up as the Multi-Page setting on the Layout menu to print two or four pages of your document on one sheet of paper.
To print more than one page on a piece of paper, you should make the following settings:
|
2 Pages
4 Pages
|
Prints two or four pages of your document on a single piece of paper.
|
|
Page Order
|
Opens the Print Layout dialog box, where you can specify the order in which the pages will be printed on the sheet of paper. Some settings may be unavailable, depending upon your Orientation selection on the Paper menu.
|
|
Print page frames
|
Prints a frame around each page that is printed on the sheet of paper.
|
Making the Poster setting
A single document page can be enlarged to cover 4, 9, or 16 printed sheets of paper. Select Poster as the Multi-Page setting to print a poster-size image.
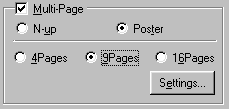
Click the Settings button to adjust the way your poster will print. The Poster Settings dialog box opens.
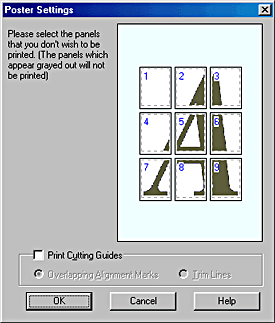
You can make the following settings.
|
Print Cutting Guides
|
Check this box to turn the cutting guide options on.
|
|
Overlapping Alignment Marks
|
Slightly overlaps the images and prints alignment markers so that they can be aligned more precisely.
|
|
Trim Lines
|
Prints border lines on the images to guide you when trimming the pages.
|
If you only want to print a few of the panels without printing the entire poster, click the panels that you do not wish to print, then click OK to close the Poster Settings dialog box.
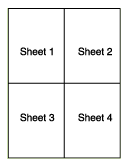
How to make a poster from your printouts
Here is an example of how to make a poster from 4 sheets of your printout. Refer to the accompanying illustrations as well.
|
|
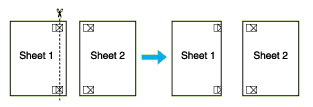
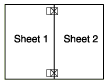
Vertically cut the margin of Sheet 1 along the line connecting the alignment markers as shown in the illustration.
|
|
|
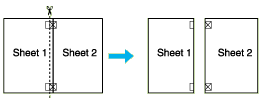
Place Sheet 1 on Sheet 2 and align the cross markers on both sheets, then temporary tape them from the back side of the paper.
|
|
|
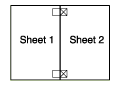
Cut off the taped sheets along the line between the alignment markers.
|
|
|
Align the paper using the alignment markers and tape them from the back side of the paper.
|
|
|
Repeat the instructions from step 1 to step 4 to tape Sheets 3 and 4 as well.
|
|
|
Repeat the instructions from step 1 to step 4 to tape top and bottom faces of the paper.
|

|
|
Cut off the remaining margins.
|
 |
Caution:
|
|
Be careful when using edged tools.
|
[Top]
Making the Watermark setting
To print a watermark on your document, click anywhere in the Watermark list box on the Layout menu, and select from the list of predefined watermarks that appears.
You can also add your own text-based or image-based watermarks to the Watermark list. To add a watermark, click the Add/Del button. The following dialog box appears.
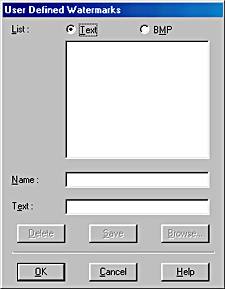
Refer to the appropriate section below to finish creating a custom watermark.
Creating an image-based watermark
Follow the steps below to create an image-based watermark.
|
|
Select BMP.
|
|
|
Click the Browse button to specify the bitmap file you want to use, then click OK.
|
|
|
Type a name for your watermark in the Name box, then click Save. Click OK to return to the Layout menu.
|
Creating a text-based watermark
Follow the steps below to create a text-based watermark.
|
|
Select Text.
|
|
|
Type your text in the Text box. The text that you enter will also be assigned to the watermark as the watermark name.
|
|
|
If you want to change the watermark name, type a new name in the Name box, then click Save. Click OK to return to the Layout menu.
|
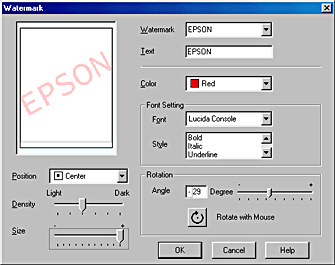
Making settings for your watermark
Follow the steps below to make settings for your watermark.
|
|
Select the desired watermark in the Watermark list box on the Layout menu.
|
|
|
Click the Settings button. The following dialog box appears.
|
|
|
Make sure that the appropriate watermark is selected in the Watermark list box, then make Color, Position, Density, Size, Font, Font Style, and Angle settings. For details, please see online help. Your settings are reflected in the display at the left side of the dialog box.
|
|
|
When you are finished making settings, click OK.
|
[Top]
| Copyright © SEIKO EPSON CORPORATION 2000, ALL RIGHTS RESERVED |

